Record Lathe, Pt.1
Filed under: Record Lathe
Hi, welcome to the first short introductory post in a series where I’m going to document my attempt at building my own record lathe!
Work on this started around a year ago, but I haven’t really gotten around to documenting any of it outside of some posts on twitter, so I felt it was time to put this project’s documentation into a less ephemeral form.
Wait, what’s a record lathe?!
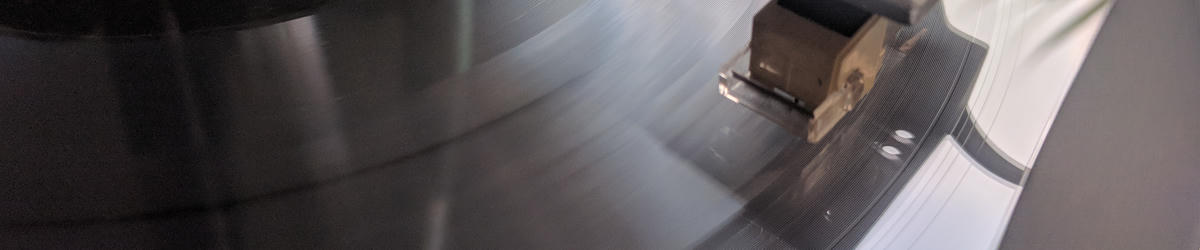
Good question! You know records, right? Round, black, shiny discs that contain music in a spiral groove?

These mass produced records are made in a disc pressing plant which squishes pucks of PVC (aka polyvinyl chloride, aka vinyl) plastic between two metal stampers that press the groove into the surface of the record and give it it’s shape. Of course, something needs to put the groove onto those stampers in the first place and that’s where a record or disc cutting lathe comes in.
In large scale record production this happens by cutting a master on a record lathe and then electroforming a negative from the master which can be used to stamp the actual records. These master records were at first cut into wax and later on lacquer coated metal discs.
Now, this might make a record lathe seem kinda useless unless you want to start your own record pressing plant but one alternative to this process is to just cut the final record directly on a record lathe. This process is rather slow since the records are cut in real time, but when you’re only making 10 records that still might be preferable to going through the hassle and expense of making a master and stampers or having a pressing plant make 500 records for you.
Alright, so where can I buy one?
You can’t. Probably. Well, maybe if you have a lot of money you can, but I definitely can’t.
With the advent of the CD in the 80s and 90s record lathes have become more and more rare and the recent resurgence in the popularity of vinyl records has made them extremely expensive. Not to mention that most of them are incredibly big and heavy, so it’s not really something you can just put into your living room.
There are some cheaper records lathes available, but those were usually designed for dictation, from the days before tape machines became available, and offer rather poor, and mono only, sound quality.
Also, where is the fun in just buying something if you can spend months of work building a possibly inferior version yourself?
In keeping with the DIY æsthetic of a lot of the music I like I’ve been thinking of different ways to manufacture my own records for multiple years but none of the options I’ve come up with ever seemed satisfactory. (3D printing records is a bad idea?!) It wasn’t until last year that I felt like I had become good enough at engineering, machining and electronics that I finally decided it was time for me to give it a serious try.
Also thanks to the proliferation of cheap 3D printers a lot of the parts required for the motion system have become very affordable and easily available online.
OK… so how do you build one?
Luckily, building a record lathe is one of the things where it’s relatively easy to get started (but much harder to finish).
Fundamentally a record lathe consists of three parts:
- A platter to spin the record
- A cutting head to cut the groove
- Some kind of motion system to move the head along the record
For the platter its easiest to just go with an off the shelf record player, which is also how I started out. In the end I did end up building my own one though, mostly because my record player lacked the torque to spin the record at constant speed under cutting forces. This also opens up some interesting possibilities when it comes to speed control in the future.
The motion system consists mostly of hardware usually found on 3D printers, 8mm linear bearings on smooth rods, a fine pitched lead screw and stepper motors. One of the most important parts of the system is the ability to move the head very slowly and smoothly while imparting as little vibration and steppyness onto it as possible.
To start off I simply mounted my first prototype heads onto a pen plotter I balanced onto my record placer. This sounded terrible but was enough for a first proof of concept.
And lastly and most importantly the cutting head, which is based around two high power exciters, basically speaker voice coils without the cones, driving a mechanical linkage and flexure which holds the cutter. This part is, by far, the most tricky and complicated to get right and where most of the work has been spent so far.
In addition to that you will of course need some kind of amplifier to drive the head and a controller and driver for the motors along with some kind of material to cut into.
In the next installment of the series we’ll take a look at how I got started, how I designed the head, and a few of the fundamentals of how record cutting works.
But why…?
Aside from the goal of personal wish fulfillment I have expressed above there is also a larger motivation behind this project.
3D printing has, over the last decade, seen a tremendous improvement in quality and affordability which was largely enabled by the availability of open source designs and the community around them. While the target audience for record cutting is undoubtedly much smaller than that for 3D printing I think the availability of designs which can be built upon and improved by others is of tremendous value in opening up access to technology and driving it forward.
I would love to see not only advancements in the availability of record manufacture for small bands and artists, which is a major challenge right now, but also enable the exploration of new materials and technologies which would allow for more environmentally friendly and sustainable records in the future.
To facilitate this it’s important to me that as many parts of the lathe as possible can be built from easily available off the shelf parts and that any custom parts can be manufactured with basic tools.