Making cyanotype glass plates
Filed under: Cyanotype, Photography
Cyanotypes are cool! But you know what’s even cooler? Making cyanotype negatives on glass plates directly in camera!
As I’ve talked about in a previous article I’ve developed a fairly reliable process to create in-camera cyanotype negatives on agar coated glass plates. They not only look great but also have a much higher resolution since they don’t have the rough structure inherent in paper negatives. On top of that having a negative on a transparent backing opens up the possibility of using it to directly make positive prints from it, which is very exciting.1
Let’s talk about my process for making them!
Things you’ll need

There are a few basic supplies you’ll need to make the plates:
- Glass plates, duh…
- Cleaning supplies
- Agar powder
- Distilled water
- Some kind of heat proof and microwave safe container
- A microwave oven
- Some kind of hot plate with temperature regulation
- Ferric ammonium oxalate, 20% in water
- Potassium ferricyanide solution, 10% in water
- A glass rod for spreading the chemicals
- An accurate scale, pipettes and measuring cup
For the glass plates I’m using blank 4x5“ glass plates from a photography store, but just about anything should work. Before using them I like to round over the sharp edges and corners with one of those sanding stick nail files to make them nicer to handle.
The agar I use is a vegan gelatin substitute from the grocery store. I haven’t tried many different brands but I assume, and hope, they’re all more or less the same. Laboratory agar for making petri dishes might also work, but I haven’t tried that.
It comes as a powder you need to dissolve in boiling water, so you’ll need some kind of heat proof container to do the boiling in. I use a small beaker because it’s also easy to pour from and looks science-y. The best way to do the boiling I’ve found to be in a microwave. It’s very fast so you won’t boil off a ton of your water and you don’t risk burning anything.
For drying the plates it’s useful to have some kind of hot plate with good temperature regulation that can reach around 60°C. I’m using the heat bed of my 3d printer because it can fit multiple plates at once but a small digitally controlled lab hotplate also works as well.
The process
Cleaning
Just before coating the glass plates it’s important to give them a thorough cleaning.
While agar generally seems to stick to glass much better than gelatin or collodion it’s still advisable to get the glass as clean as possible. Any grease or fingerprints will keep the agar from flowing and adhering properly.
I usually just scrub them using a clean kitchen sponge and some dish soap or mild abrasive cleaner. Afterwards wipe I wipe them dry with a paper towel.
Making the solution

Measuring out the agar powder, 2g for 100ml of water 
First round of boiling in the microwave, still very foamy 
Giving it a stir after the first round of boiling. Still very bubbly and lumpy looking 
Nice big bubbles after a few more rounds of boiling. Taking photos inside a microwave is hard… 
Perfectly clear and no bubbles now, ready for use


To make the agar solution I use 2g of agar per 100ml of distilled water. Each 4x5“ plate needs around 30ml, which turns out to be around 0.25ml per cm². It’s good to make a little extra and preferable to ending up short on the last plate.
I add the agar to the cold water and bring it to a boil in the microwave do dissolve it. It tends to get a little foamy in the beginning, so I microwave it in short bursts with stirring in between to make sure it doesn’t boil over and no lumps form. You know it’s ready when the solution turns clear and instead of foaming it just makes big bubbles when boiling. There should be no foam or bubbles left on the surface when you take it out.
Coating

Cleaned plates set up ready for coating 
Pouring on the agar… 
Plate fully coated with the solution 
Agar fully set and ready to handle 
Drying the plates on the heated print bed of my 3d printer 
A lab hotplate works too as long as you can accurately control it's temperature 
The fully dried plate, the coating has become almost invisible


It’s very important to set the plates up on a level surface before pouring on the agar solution to ensure it comes out even and doesn’t just run off. It also helps to raise them up a little so that in case there is any overflow surface tension won’t make everything spill off the plate.
Once the agar solution is ready pour it onto each plate in one continuous pour, just enough so it’s fully covered but surface tension keeps it from spilling over the edge. This takes a little bit of practice but isn’t as hard as it sounds. A quicker pour will allow you to minimize pour lines.
Leave the plates sit for a couple of minutes to let them cool and solidify before moving or handling them in any way. You know they’re ready when the agar takes on a very slightly hazy appearance. At that point you can carefully move the plates over to your hotplate to dry them. I set my hotplate to 60°C and it takes around 1-2 hours for the plates to fully dry.1
At that point they’re ready to be stored for later or sensitized.
Sensitizing

Stuff needed for sensitizing the plate 
Freshly sensitized plate


To sensitize the plates I use a 20% solution of ferric ammonium oxalate in distilled water, around 1ml for a 4x5“ plate. I pipette the solution onto the dried plate and carefully spread it using the glass rod, squeegeeing it back and forth over the agar until all liquid has been absorbed. Be careful not to scratch the coating since it becomes somewhat delicate when wet.
Afterwards I put it back onto the hotplate, this time in the dark, letting it dry for a couple of minutes till the surface has completely hardened.
The sensitized plate is now ready for use or storage and should keep for a while in the dark.
Exposure!

Trying to take a photo of some plants in the shade. This was a mistake… 
Framing! 
For indoor shots you can also use 405nm UV flood lights


I use a simple home made view camera with a 135mm f/5.6 lens to expose my 4x5“ plates. Exposures take around 5 hours in bright sunlight or under 150W of 405nm LED light. The plates have a very large exposure latitude, so there is no real risk of overexposing them.
Developing

Developing… 
Whelp, that looks like shit! Don't take photos of things in the shade on cloudy days… 
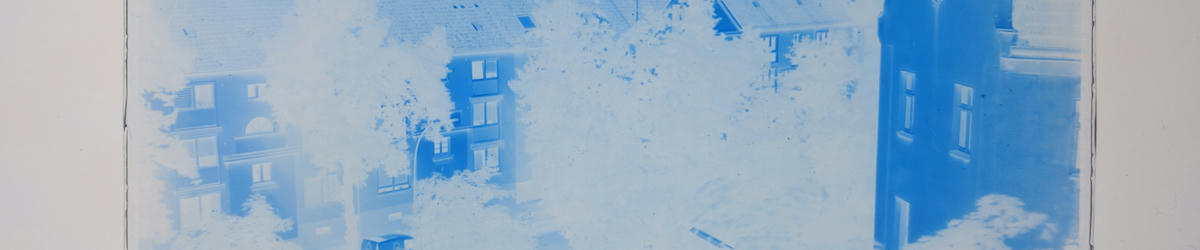
Here are some nicer ones I took earlier 
And another one! 
And on more!


To develop exposed plates I use the same method as above, but spreading around 1ml of a 10% potassium ferricyanide solution on the plate instead. If it has been properly exposed the image should appear more or less instantly.
After development I rinse the plate in water until any trace of yellow has been removed and the water that comes off the plate is completely clear.
Drying is again done on a 60°C hotplate for a few minutes.
Recycling and cleaning plates
The easiest way I’ve found to remove the agar coating is to soak the plate in warm water for a few minutes and scraping it off with a razor blade or other kind of scraper. Afterwards the plate can be cleaned as before to remove any remaining bits of agar before re-using it.
Conclusion? Feedback?

Anyways, that’s it! I think…? Let me know if you give this a try and what your experiences are!
I’m currently working on a bunch of different ideas on how to improve the sensitivity of these plates, so check back here or follow me on mastodon to see how that’s going.
Love,
Kris ~<3
Footnotes
But also very tricky because cyanotypes (and regular photo paper) are mostly sensitive to blue light, which is not really blocked or absorbed by the blue pigment in cyanotypes, so prints end up having a very low contrast. Toning the negative might help with that though.
One of the great properties of agar is that it has a large melting point hysteresis, so while it melts at around 90-95°C it stays liquid down to around 35-40°C before solidifying into a gel. This gives you lots of time to work and you don’t have to worry about accidentally re-melting it when heating the plates to dry them later.